CLion
CLion is a cross-platform C/C++ IDE for Linux, OS X, and Windows. CLion includes such features as a smart editor, code generation, code quality assurance, automated refactorings, on-the-fly code analysis, project manager, integrated version control systems and debugger.
Refer to the CLion Documentation page for more detailed information.
Installation
Install PlatformIO Core (CLI). See Installation guide
Warning
This a temporary step and depends on CLion #CPP-19412: Automatically install PlatformIO Core
Download and install CLion IDE
Install the official PlatformIO for CLion plugin. Open “Configure > Plugins” window and go to the “Marketplace” tab. Search for
PlatformIOand press the “Install” button. If you do not see it in the marketplace, check that your CLion version is supported by the latest plugin version. You may need to downgrade or upgrade CLion.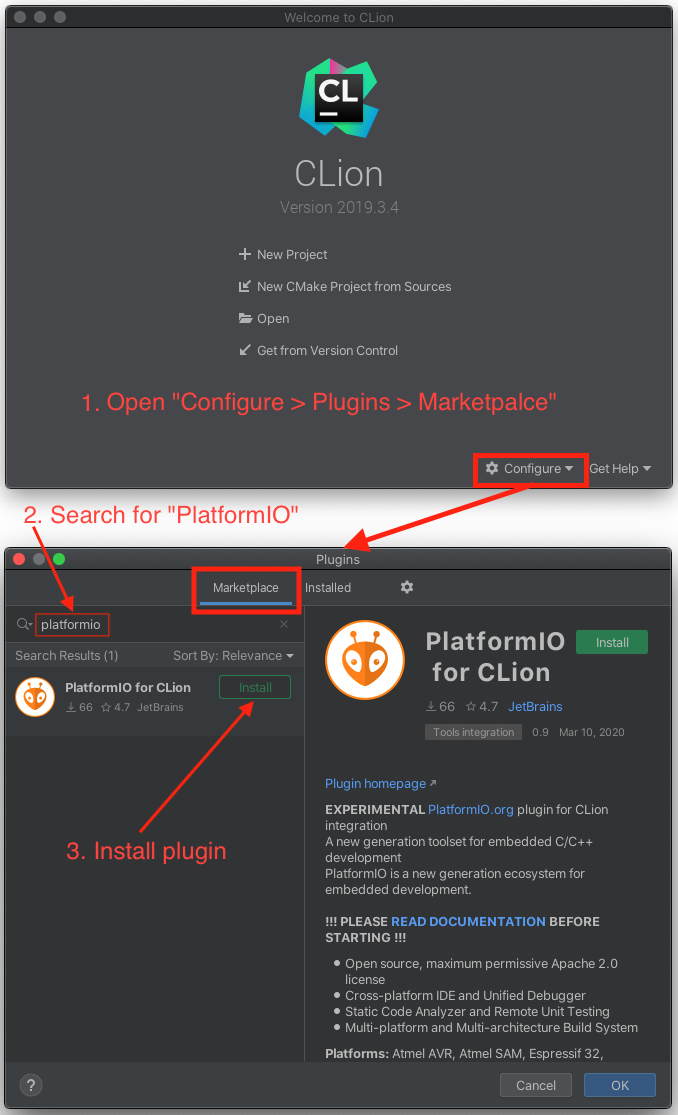
Restart CLion IDE.
Note
We also recommend to install Ini plugin that provides syntax highlighting, formatting, code folding, and viewing structure for “platformio.ini” (Project Configuration File).
Known issues
Project configuration and CMake
PlatformIO does not depend on “CMake” and uses own multi-platform build system. Project configuration, such as build flags, library dependencies, etc., should be declared in “platformio.ini” (Project Configuration File).
Warning
Please note that “PlatformIO for CLion” plugin does not update automatically CLion configuration. There is a feature request CLion #CPP-18367: Follow platformio.ini changes and update the project.
Update CLion configuration: “Tools > PlatformIO > Re-Init”
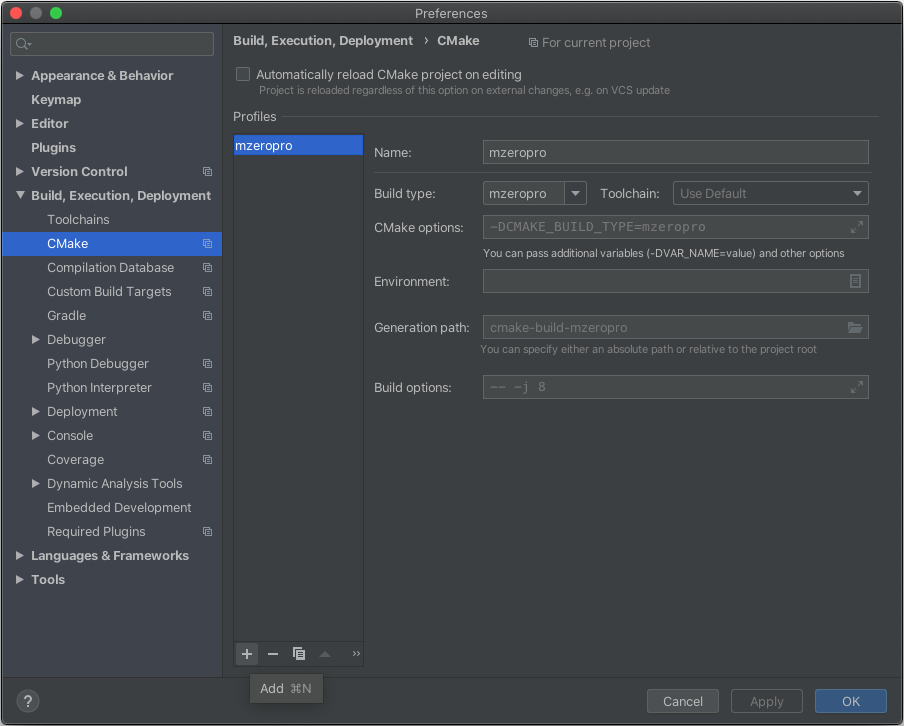
CLion does not load project build environments from “platformio.ini”
This is a known issue CLion CPP-19478: CLion does not handle “CMAKE_CONFIGURATION_TYPES” from CMakeLists.txt. A temporary solution is to manually configure project profiles in CLion.
Please open CLion Settings and navigate to “Build, Execution, Deployment > CMake”. Press “+” button and PlatformIO-based project profiles:
Arduino .ino files are not supported
CLion uses “CMake” tool for code completion and code linting. As a result, it
doesn’t support the Arduino files (*.ino and .pde) because they are
not valid C/C++ based source files:
Missing includes such as
#include <Arduino.h>Function declarations are omitted.
See how to Convert Arduino file to C++ manually.
CLion with ESP-IDF
Starting with version 4.0, ESP-IDF uses a build system based on CMake. In order to
provide more seamless integration, PlatformIO uses the CMake file-based API to extract
build configurations. Because of this approach, there is a conflict between
CMakeLists.txt used by ESP-IDF and CMakeLists.txt which PlatformIO generates
for CLion. At the moment we’re working on better integration with CLion without this
intermediate CMakeLists.txt, but there is no ETA for this feature.
Quick Start
This tutorial introduces you to the basics of PlatformIO for CLion workflow and shows you a creation process of a simple “Blink” example. After finishing you will have a general understanding of how to work with projects in the CLion IDE.
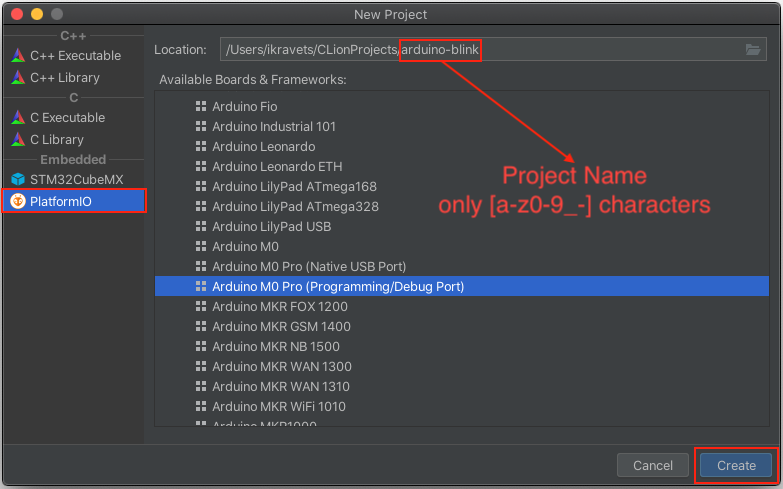
Setting Up the Project
Please open “New Project” wizard, select board and framework, and create a new PlatformIO project. Please USE ONLY Latin characters (a-z) in a project name to avoid further issues with project compilation. Numbers and some symbols are allowed depending on a file system:
Rename
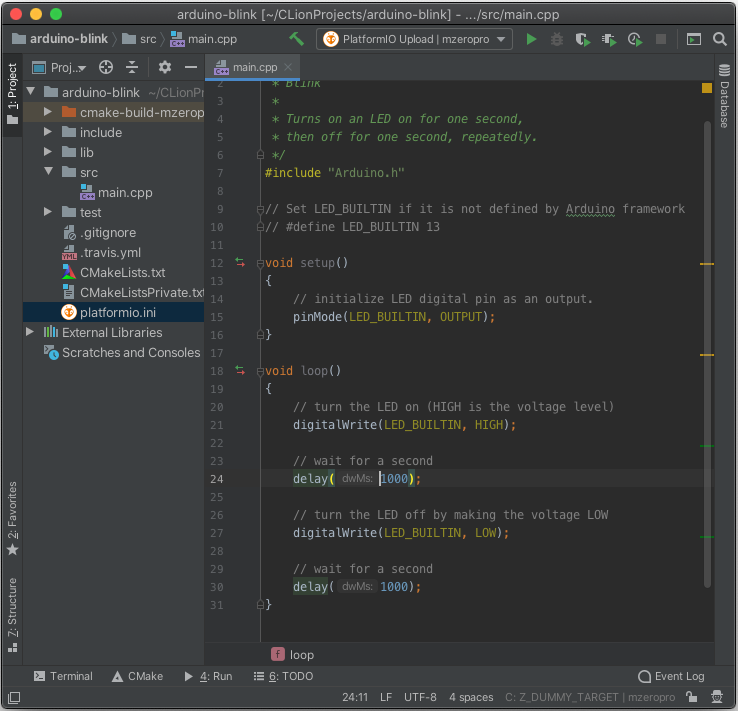
main.cfile insrcfolder tomain.cpp(right click on a filemain.c, Refactor > Rename...) . Paste the next contents:
Warning
The code below works only in pair with Arduino-based boards. Please follow to PlatformIO Project Examples repository for other pre-configured projects.
/**
 * Blink
 *
 * Turns on an LED on for one second,
 * then off for one second, repeatedly.
 */
#include "Arduino.h"

// Set LED_BUILTIN if it is not defined by Arduino framework
// #define LED_BUILTIN 13

void setup()
{
  // initialize LED digital pin as an output.
  pinMode(LED_BUILTIN, OUTPUT);
}

void loop()
{
  // turn the LED on (HIGH is the voltage level)
  digitalWrite(LED_BUILTIN, HIGH);

  // wait for a second
  delay(1000);

  // turn the LED off by making the voltage LOW
  digitalWrite(LED_BUILTIN, LOW);

   // wait for a second
  delay(1000);
}
Build & Upload
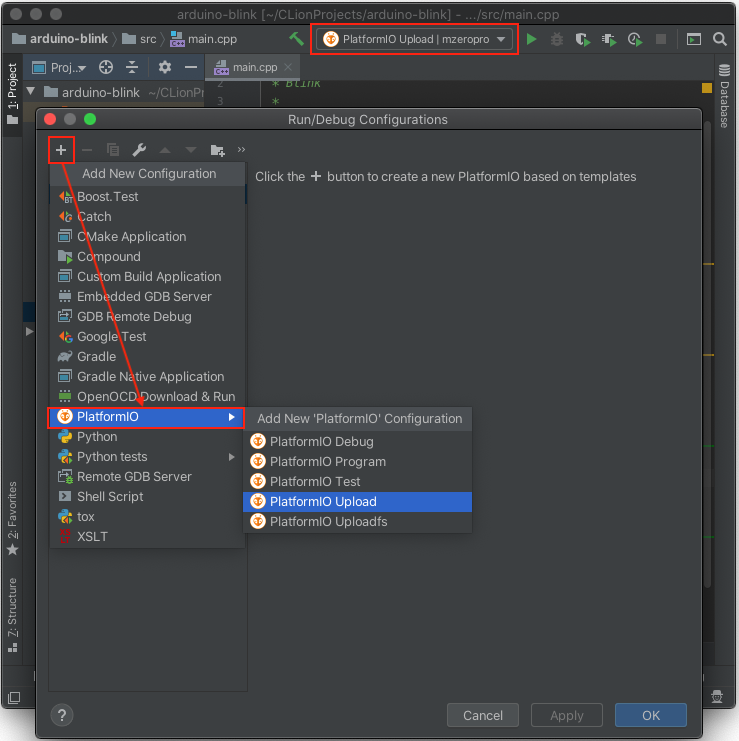
Open project configuration wizard and add
PlatformIO UploadandPlatformIO Debugconfigurations (you can add the rest configurations if you need them):
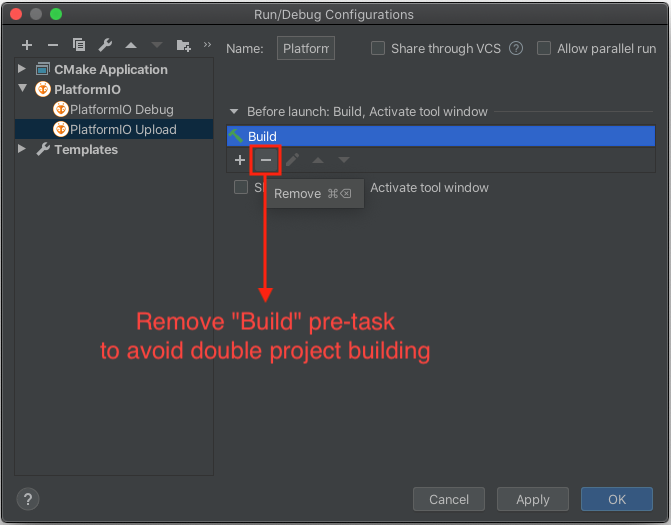
Remove pre-task (“Build”) from
PlatformIO UploadandPlatformIO Debugconfigurations to avoid double project building. You should see “There are no tasks to run before launch”.
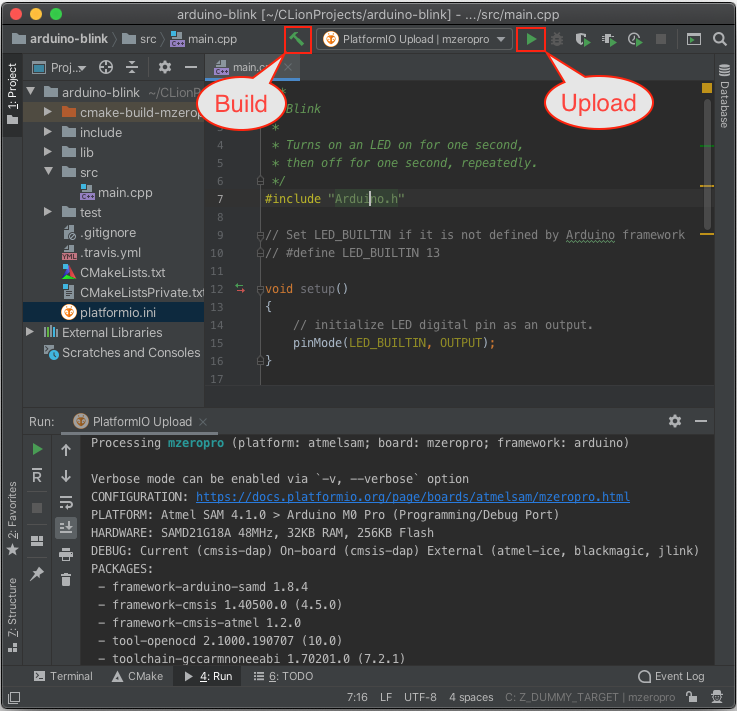
Select
PlatformIO Uploadconfiguration and use the “Build” button for project compilation or the “Run” for a firmware uploading:
Configuration options
Device/Serial Monitor
Please open CLion terminal and use Device Manager CLI. You can also configure device monitor per project using Monitor options.
Please note that you need to manually close/stop device monitor before firmware uploading.
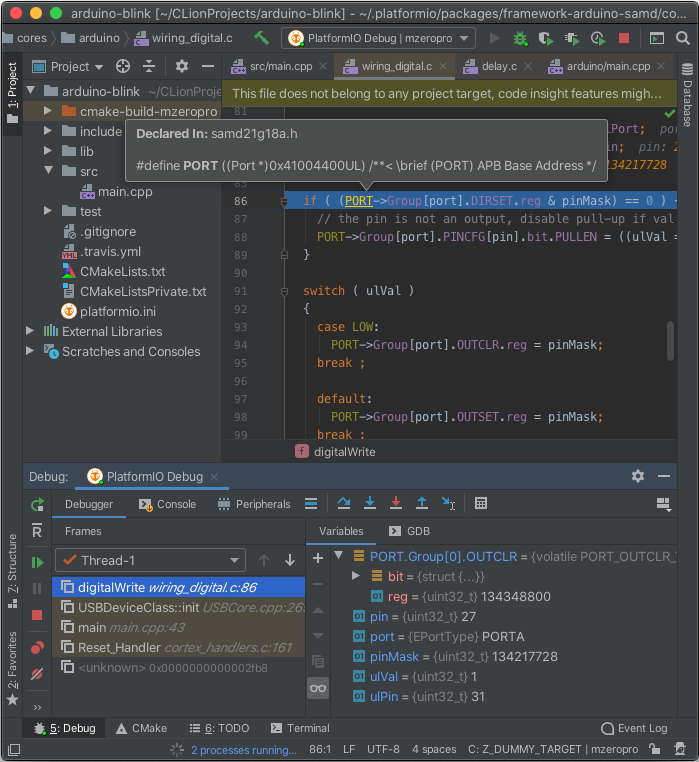
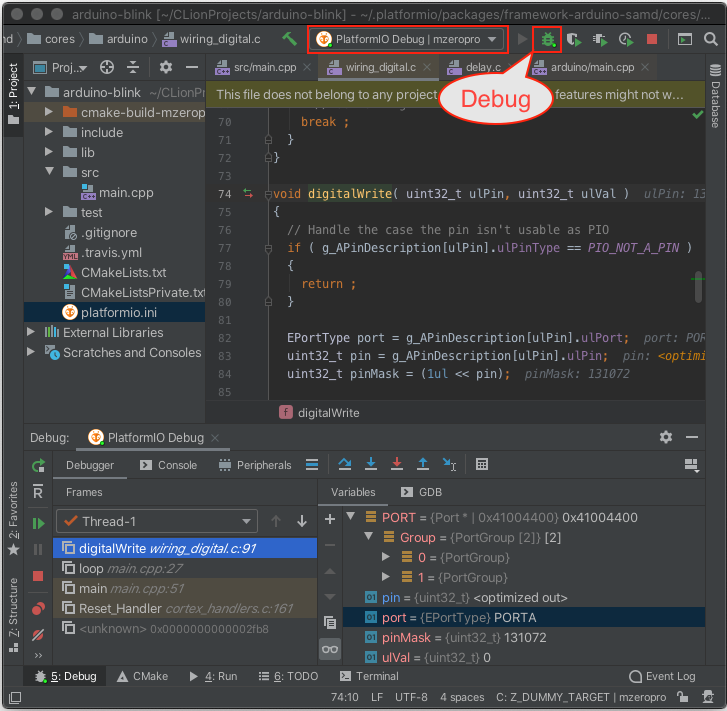
Debugging
“PlatformIO for CLion” supports Debugging which allows you to debug your
application with 1-Click without extra steps. Please select PlatformIO Debug
configuration and press the “Debug” button:
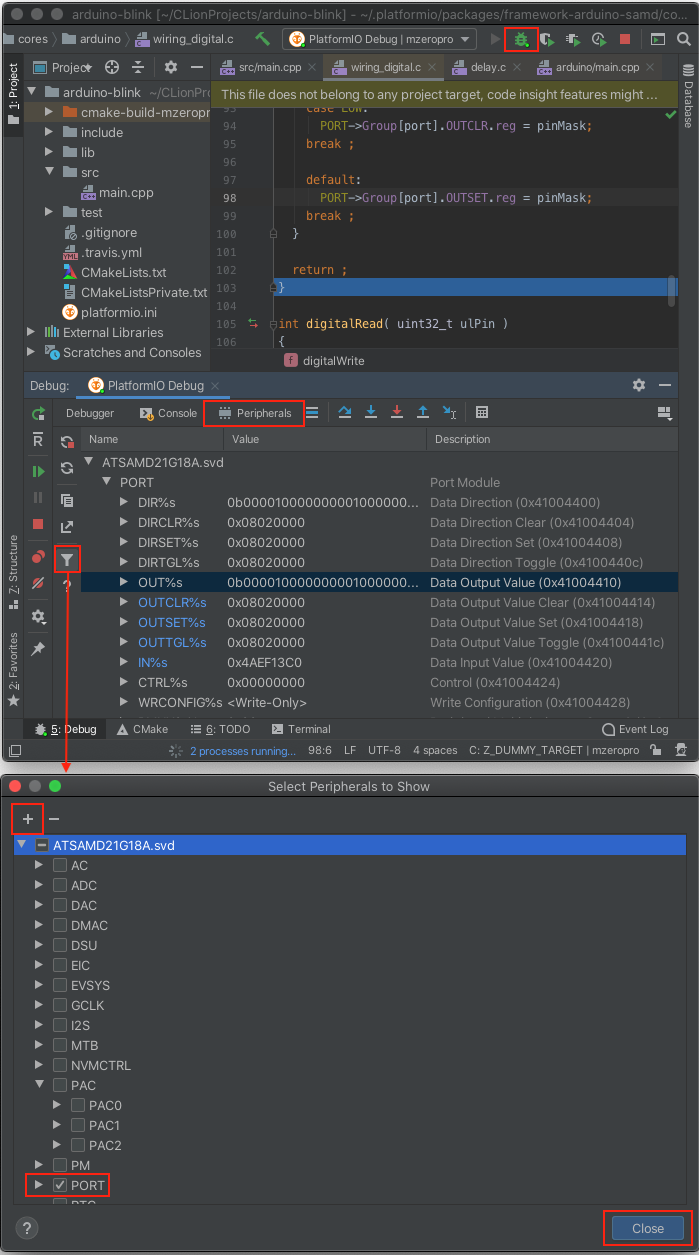
Peripheral Registers
Please navigate to the “Peripheral” tab in a “Debug” view, press the “Configure” icon and select registers to monitor. Close configuration window.
Warning
Currently, CLion does not load automatically Peripheral Register Definitions (SVD file) provided by PlatformIO. There is a feature request CLion #CPP-18369: Support CLION_SVD_FILE_PATH CMake variable to auto-find svd file.
A temporary solution is to open CMakeListsPrivate.txt file from a root of
PlatformIO project and remember SVD file declared in CLION_SVD_FILE_PATH
“CMake” variable. Now press the “+” button in Peripherals Wizard and select SVD file
mentioned in CLION_SVD_FILE_PATH.
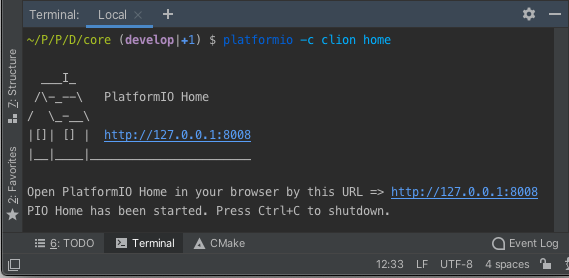
PlatformIO Home
Currently, PlatformIO Home is not integrated into “PlatformIO for CLion”. See related feature request CLion: CPP-19493 Integrate PlatformIO Home.
Nevertheless, you can start it manually and open in your browser. Please note that some features do not work, such as project opening. Please open CLion terminal and run pio home command:
pio -c clion home
Further for reading:
Tutorials and Examples (step-by-step tutorials with debugging and unit testing)
Happy coding with PlatformIO!