PlatformIO IDE for VSCode
Visual Studio Code is a lightweight but powerful source code editor which runs on your desktop and is available for Windows, macOS and Linux. It comes with built-in support for JavaScript, TypeScript and Node.js and has a rich ecosystem of extensions for other languages (such as C++, C#, Python, PHP, Go) and runtimes (such as .NET and Unity)
Installation
Note
Please note that you do not need to install PlatformIO Core (CLI) separately if you are going to use PlatformIO IDE for VSCode. PlatformIO Core (CLI) is built into PlatformIO IDE and you will be able to use it within PlatformIO IDE Terminal.
Git: If you are going to use Git for installing upstream development platforms, cloning
external projects, installing library dependencies from a repository, please ensure
that git --version command works from a system terminal. Otherwise, please
install a Git client.
Linux Users: To ensure a smooth experience with PlatformIO, it is essential to have the python3-venv package installed on your system.
Download and install official Microsoft Visual Studio Code. PlatformIO IDE is built on top of it
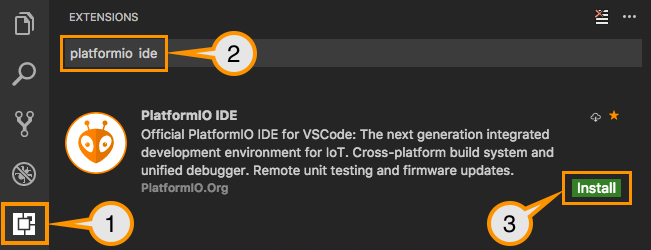
Open VSCode Package Manager
Search for the official
platformio ideextensionInstall PlatformIO IDE.
Quick Start
This tutorial introduces you to the basics of PlatformIO IDE workflow and shows you a creation process of a simple “Blink” example. After finishing you will have a general understanding of how to work with projects in the IDE.
Setting Up the Project
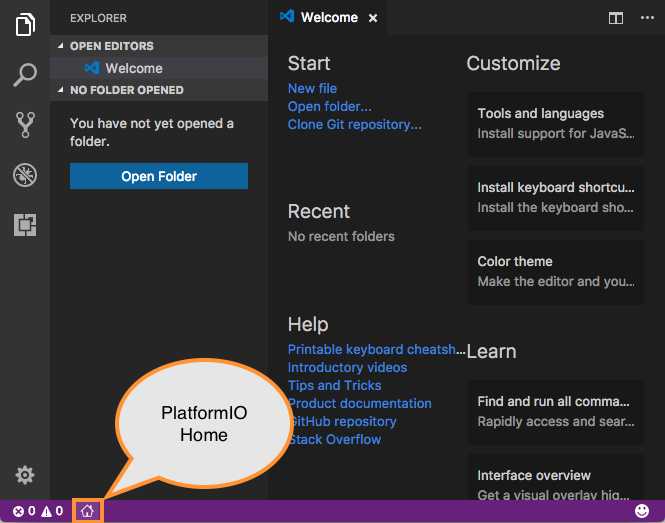
Click on “PlatformIO Home” button on the bottom PlatformIO Toolbar
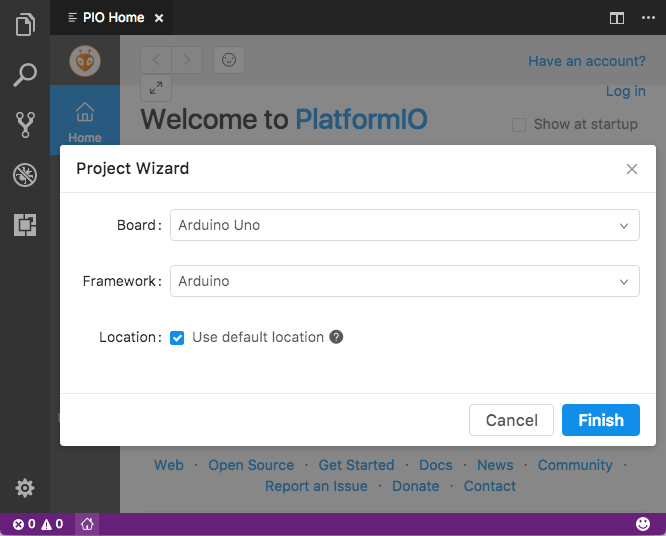
Click on “New Project”, select a board and create new PlatformIO Project
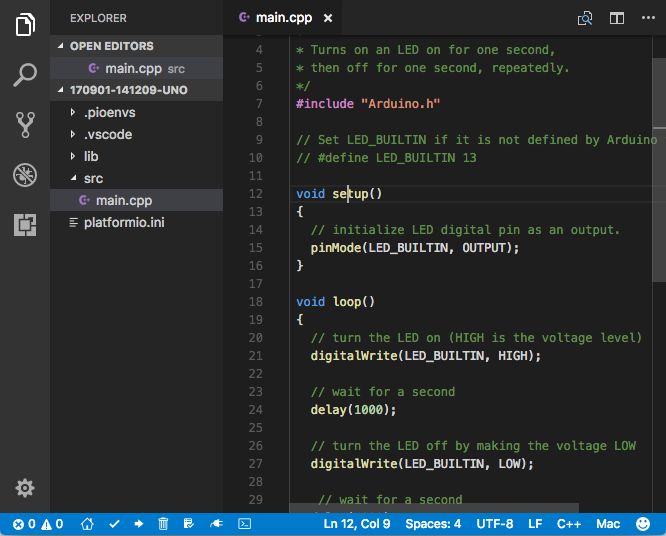
Open
main.cppfile fromsrcfolder and replace its contents with the next:
Warning
The code below works only in pair with Arduino-based boards. Please follow to PlatformIO Project Examples repository for other pre-configured projects.
/**
 * Blink
 *
 * Turns on an LED on for one second,
 * then off for one second, repeatedly.
 */
#include "Arduino.h"

// Set LED_BUILTIN if it is not defined by Arduino framework
// #define LED_BUILTIN 13

void setup()
{
  // initialize LED digital pin as an output.
  pinMode(LED_BUILTIN, OUTPUT);
}

void loop()
{
  // turn the LED on (HIGH is the voltage level)
  digitalWrite(LED_BUILTIN, HIGH);

  // wait for a second
  delay(1000);

  // turn the LED off by making the voltage LOW
  digitalWrite(LED_BUILTIN, LOW);

   // wait for a second
  delay(1000);
}
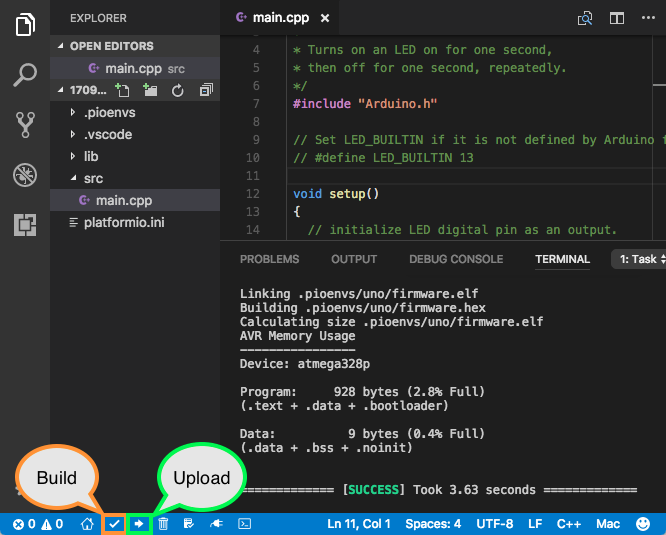
Build your project with
ctrl+alt+bhotkey (see all Key Bindings in “User Guide” section below) or using “Build” button on the PlatformIO Toolbar
Further for reading
Tutorials and Examples (step-by-step tutorials with debugging and unit testing)
Learn more about PlatformIO Toolbar and other commands (Upload, Clean, Serial Monitor) below
“platformio.ini” (Project Configuration File) (change upload_port, configure build_flags, add library dependencies lib_deps, etc.)
Happy coding with PlatformIO!
PlatformIO Toolbar
PlatformIO IDE Toolbar is located in VSCode Status Bar (left corner) and contains quick access buttons for the popular commands. Each button contains hint (delay mouse on it).

PlatformIO: Build
PlatformIO: Upload
PlatformIO: Clean
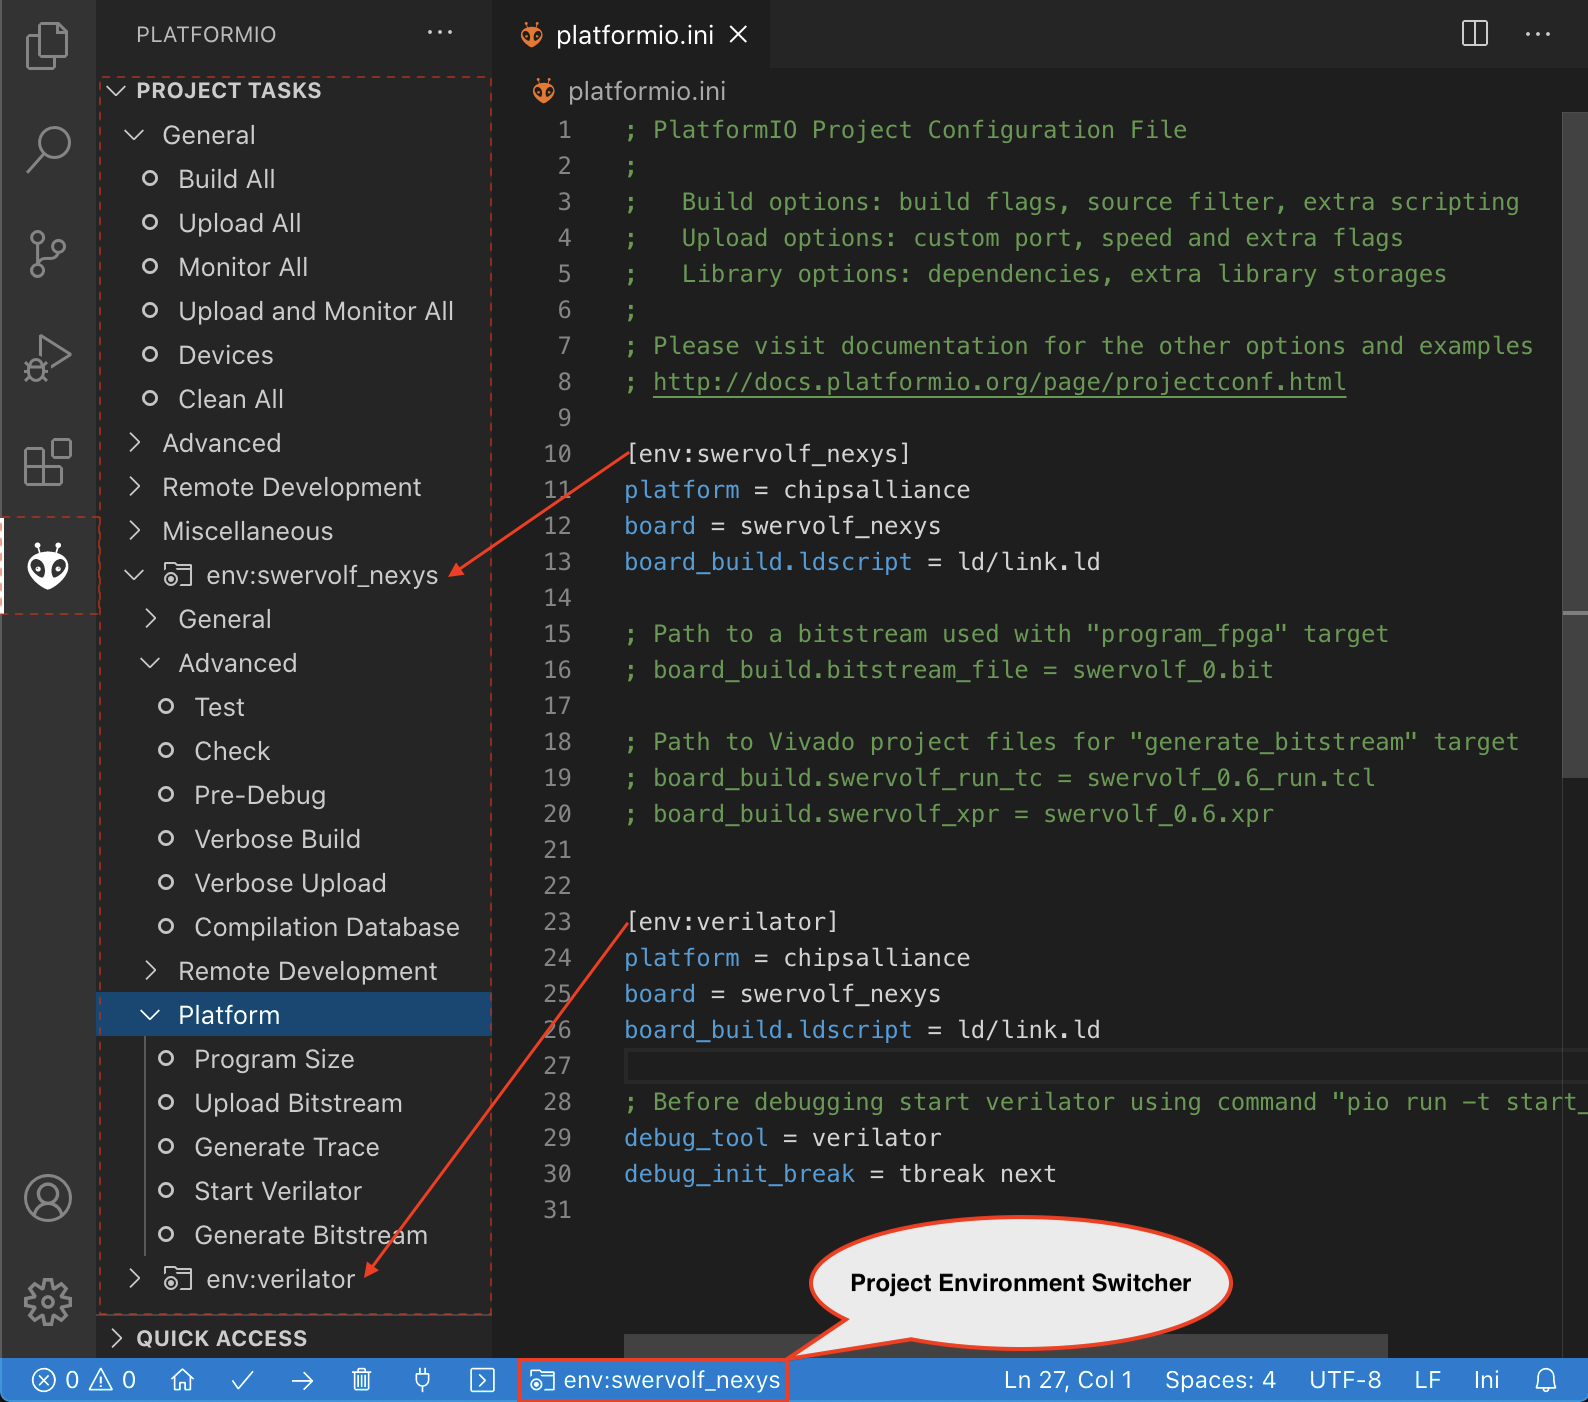
Project environment switcher (if more than one environment is available). See Section [env] of “platformio.ini” (Project Configuration File) .
You can override default buttons and create your own toolbar.
See platformio-ide.toolbar in Settings.
PlatformIO Core (CLI)
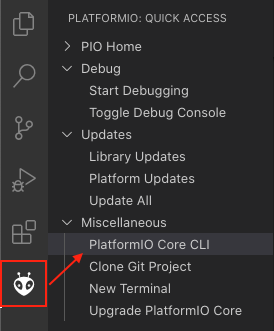
There are 2 ways how to access PlatformIO Core (CLI):
“Terminal” icon on the PlatformIO Toolbar

Left Activity Bar > PlatformIO (ant icon) > Quick Access > Miscellaneous > PlatformIO Core CLI
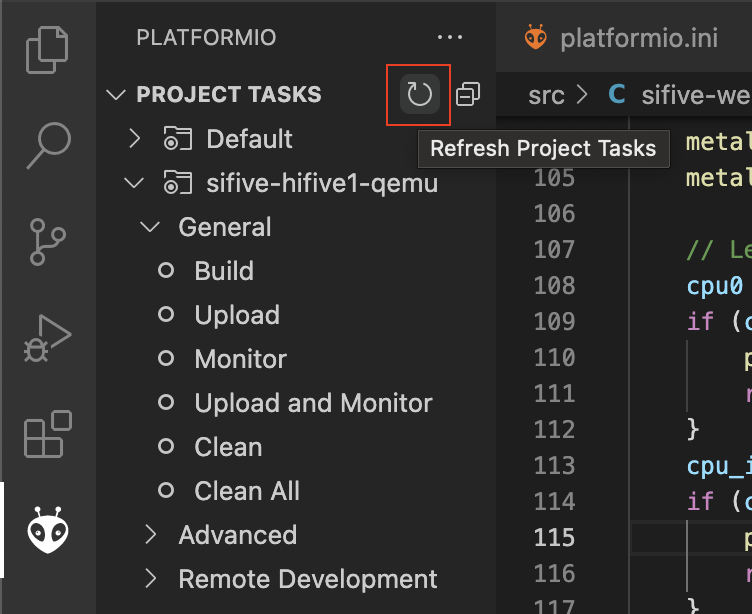
Project Tasks
Task Explorer
PlatformIO provides access to “Project Task” where you can control the build process of the environments declared in “platformio.ini” (Project Configuration File). Project Task Explorer is located in the VSCode Activity Bar under the branded PlatformIO icon. You can also access it via “VSCode Menu > Open View... > PlatformIO”.
Hint
Please note that you can drag/move “Project Task” into to the another view within VSCode, such as “Explorer”.
Task Runner
PlatformIO IDE provides built-in tasks through the menu Terminal > Run Task... (Build,
Upload, Clean, Monitor, etc) and custom tasks per “platformio.ini” (Project Configuration File) environment
([env:***]). The default behavior is to use Terminal Panels for presentation,
one panel dedicated to each unique task.
The PlatformIO IDE provides its own Problems Matcher named $platformio.
You can use it later if you decide to change base task settings.
You can override existing tasks with your own presentation options. For example, let’s configure PlatformIO Task Runner to use a NEW Terminal panel for each “Build” command:
The menu item
Terminal > Run Task...opens up a list of VSCode tasks for PlatformIO. In the linePlatformIO: Build, press the gear icon on the far right side of the list. This creates or opens the file.vscode/tasks.jsonwith some template code.Replace the template in
tasks.jsonwith this code
{
    "version": "2.0.0",
    "tasks": [
        {
            "type": "PlatformIO",
            "task": "Monitor",
            "problemMatcher": [
                "$platformio"
            ],
            "presentation": {
                "panel": "new"
            }
        }
    ]
}
See more options in the official VSCode documentation.
Custom Tasks
Please declare Custom Targets and refresh Task Explorer:
Multi-project Workspaces
You can work with multiple project folders in Visual Studio Code with multi-root workspaces. This can be very helpful when you are working on several related projects at the same time. Read more in the documentation Multi-root Workspaces.
Serial & UDP Plotter
See Teleplot - Ridiculously-simple telemetry viewer community extension.
Serial Port Monitor
You can customize Serial Port Monitor using Monitor options in “platformio.ini” (Project Configuration File):
Example:
[env:esp32dev]
platform = platformio/espressif32
framework = arduino
board = esp32dev

; Custom Serial Monitor port
monitor_port = /dev/ttyUSB1

; Custom Serial Monitor speed (baud rate)
monitor_speed = 115200
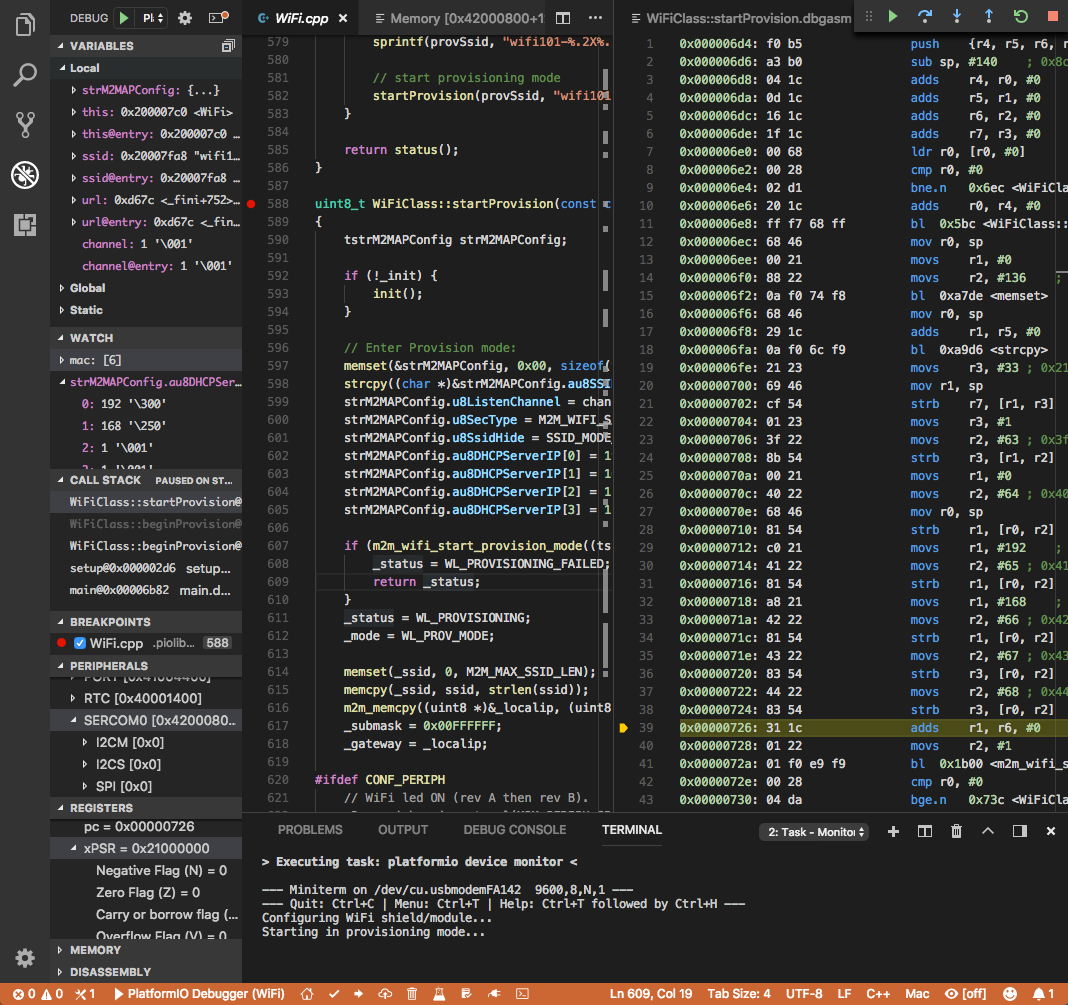
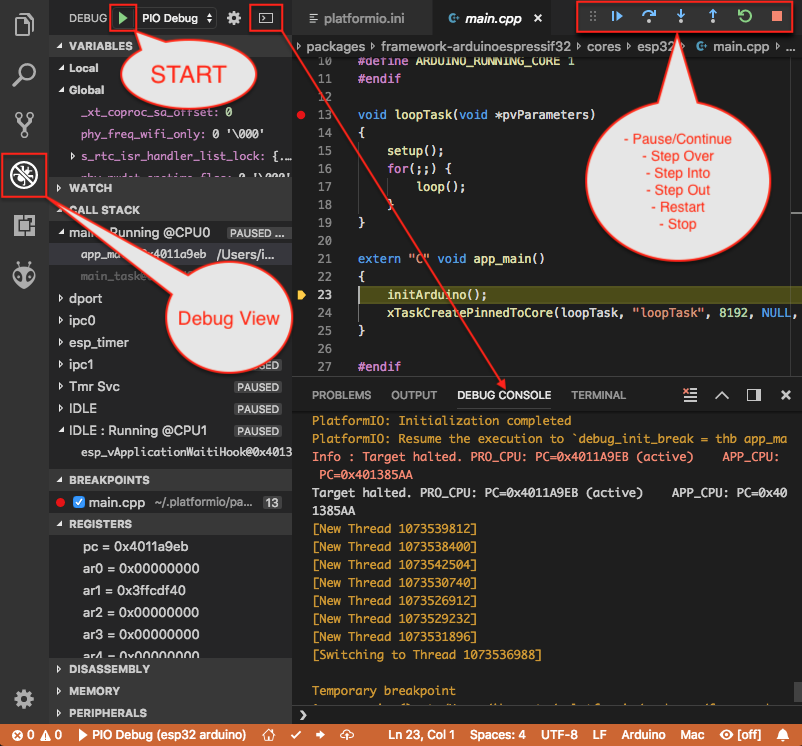
Debugging
Debugging in VSCode works in combination with Debugging. You should have PlatformIO Account to work with it.
VSCode has a separate activity view named “Debug” (accessed by the bug icon on the left toolbar). Debugging extends it with more advanced debugging instruments and features:
Local, Global, and Static Variable Explorer
Conditional Breakpoints
Expressions and Watchpoints
Generic Registers
Peripheral Registers
Memory Viewer
Disassembly
Multi-thread support
A hot restart of an active debugging session.
There are two pre-configured debugging configurations:
- PIO Debug:
Default configuration. PlatformIO runs the Pre-Debug task and builds the project using Debug Configuration. Also, it checks for project changes.
- PIO Debug (skip Pre-Debug):
PlatformIO skips the Pre-Debug stage and DOES NOT build or check the project for changes. If you do changes in project source files, they will not be reflected in debug sessions until you switch back to the “PIO Debug” configuration or manually run the “Pre-Debug” task.
This configuration is very useful for quick debug session. It is super fast by skipping several checks, letting you control project changes manually.
Note
Please note that Debugging will use the first declared build environment in “platformio.ini” (Project Configuration File) if the default_envs option is not specified.
Variable Format
Currently, VSCode does not provide an UI or API to change the variable format. See the related VSCode Issue #28025.
A temporary solution is to set the default numerical base in which the debugger displays numeric output in the Debug Console. (The Debug Console is visible during active debugging sessions). For example, to show variables in hexadecimal format, copy the code below and paste it into “Debug Console”:
set output-radix 16
Possible values, listed in decimal base, are: 8, 10, 16.
Watchpoints
Please read GDB: Setting Watchpoints first.
Currently, VSCode does not provide an API to change the value format of watchpoints. You can manually cast watchpoint expressions to display the value as specific pointer types:
$pc, default decimal integer format*0x10012000, an address, default decimal integer format(void*)$pc, $pc register, hexadecimal format*(void**)0x10012000, an address, hexadecimal format
Install Shell Commands
Please refer to PlatformIO Core Install Shell Commands.
Proxy Server Support
There are two options how to configure a proxy server:
Open VSCode Settings and search for “Proxy”. Please set “Http: Proxy” and disable “Http: Proxy Strict SSL”.
Configure PlatformIO Core Proxy Configuration.
Key Bindings
ctrl+alt+b/cmd-shift-b/ctrl-shift-bBuild Projectcmd-shift-d/ctrl-shift-dDebug projectctrl+alt+uUpload Firmwarectrl+alt+sOpen Serial Port Monitor
You can override existing key bindings or add a new in VSCode. See official documentation Key Bindings for Visual Studio Code.
Settings
How to configure VSCode settings?
platformio-ide.activateProjectOnTextEditorChange
Automatically activate project depending on an active opened text editor.
The default value is false.
platformio-ide.autoOpenPlatformIOIniFile
Automatically open the “platformio.ini” (Project Configuration File) file from a project when no other editors are opened.
The default value is true.
platformio-ide.autoCloseSerialMonitor
If true, automatically close pio device monitor before uploading/testing.
The default value is true.
platformio-ide.autoRebuildAutocompleteIndex
If true, automatically rebuild the C/C++ Project Index when “platformio.ini” (Project Configuration File)
is changed or when new libraries are installed. The default value is true.
platformio-ide.showEditorTitleShortcuts
Show Build, Upload, Clean, and other buttons in the editor title bar.
The default value is true.
platformio-ide.autoPreloadEnvTasks
Automatically preload ALL project environment tasks. The default value is false.
platformio-ide.customPATH
Custom PATH for the platformio command. Paste here the result of echo $PATH
(Unix) / echo %PATH% (Windows) command by typing into your system terminal
if you prefer to use a custom version of PlatformIO Core (CLI). The default value is null, meaning PlatformIO looks for the platformio command in the system path.
platformio-ide.reopenSerialMonitorDelay
Configure the time in milliseconds before reopening the Serial Port Monitor.
The default value is 0, which means to reopen instantly.
platformio-ide.useBuiltinPython
Use a portable Python 3 Interpreter if available. The default value is true.
platformio-ide.useBuiltinPIOCore
If true, use the built-in PlatformIO Core (CLI). The default value is true.
platformio-ide.useDevelopmentPIOCore
If true, use the development version of PlatformIO Core (CLI). The default
value is false.
platformio-ide.disablePIOHomeStartup
Disable showing PlatformIO Home at startup. The default value is false.
platformio-ide.pioHomeServerHttpHost
PlatformIO Home server HTTP host.The default is 127.0.0.1, but in case of dockerized environments 0.0.0.0.
platformio-ide.pioHomeServerHttpPort
PlatformIO Home server HTTP port. The default value 0 automatically assigns a free port in
the range [45000..45999]).
platformio-ide.customPyPiIndexUrl
Custom base URL of the Python Package Index (default https://pypi.org/simple).
platformio-ide.toolbar
Configure your own PlatformIO Toolbar with your own buttons and attach commands to them. There is no limitation to command scope. You can use Built-in VSCode Commands or commands from your 3rd party favorite extensions.
The button can be text, an icon, or a mix of them. The list of supported icons is documented in VSCode Icon Listing. You can have different toolbars per workspace thanks to the User and Workspace Settings.
Example
{
  "platformio-ide.toolbar": [
    {
      "text": "$(arrow-right)",
      "tooltip": "Upload and Monitor the active environment",
      "commands": "platformio-ide.uploadAndMonitor"
    },
    {
      "text": "Outdated",
      "tooltip": "List outdated packages for the activate environment",
      "commands": [
        {
          "id": "workbench.action.tasks.runTask",
          "args": "PlatformIO: Outdated (${command:platformio-ide.activeEnvironment})"
        }
      ]
    },
    {
      "text": "$(list-selection)",
      "tooltip": "List devices",
      "commands": [
        {
          "id": "platformio-ide.runPIOCoreCommand",
          "args": "pio device list"
        }
      ]
    },
    {
      "text": "$(plug)",
      "commands": [
        {
          "id": "platformio-ide.runPIOCoreCommand",
          "args": "pio device monitor --filter time"
        }
      ]
    },
    {
      "text": "$(terminal)",
      "commands": [
        {
          "id": "workbench.action.terminal.sendSequence",
          "args": {
            "text": "echo 1\n"
          }
        }
      ]
    }
  ]
}
Known issues
PackageManager is unable to install tool
This is a known bug in VSCode Terminal issue #61.
A temporary solution is to install packages using a system terminal (not VSCode Terminal). Please use “Solution 3: Run from Terminal” in FAQ > Package Manager > [Error 5] Access is denied. Afterwards, go back to using the VSCode Terminal.
Changelog
Please visit the releases page.